

 |
| Advertisement |
This post contains affiliate links to kitchen tools we use and recommend
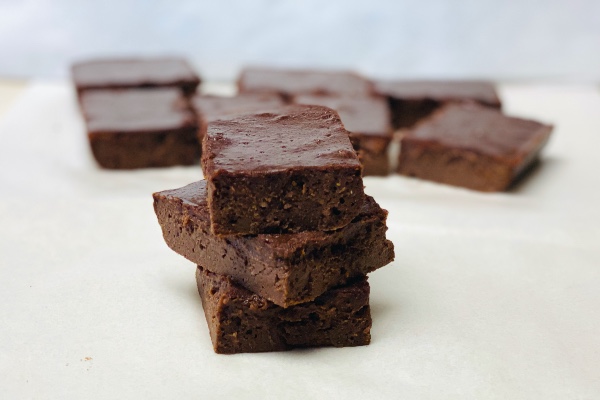
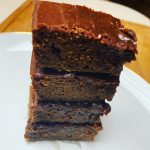
These sweet potato protein brownies are made in the delicious fudgy-style. They’re so low in calories, yet taste so amazing, you won’t believe the recipe includes no butter, no refined sugar, no white flour, and no chocolate… or that they have only 139 calories. (Compared to traditional brownies the same size with 280 to 320 calories). Are these the best sweet potato protein brownies in the world? Maybe not. Traditional brownies made with gobs of butter and cups of sugar, with the crackly tops are decadent. But I think this healthy physique-friendly protein brownie recipe is the best I’ve ever had, calorie-for-calorie.
Brownie Types: Fudgy Or Cakey
There are two categories of brownies: cakey and fudgy. (Some say that chewy is a third). Fudgy brownies are more dense. Cakey brownies are lighter and fluffier, as they rise more during baking as little air pockets are created.
Whether a brownie recipe is cakey or fudgy depends on the ingredients, including how much flour and fat there is, and whether leavening is used or not.
The main ingredients in traditional brownies are eggs, chocolate, sugar, butter and flour. These ingredients make rich, dense, fudgy brownies with a deep chocolate flavor. Of course they are not healthy or low calorie.
To get a dense, fudgy, healthier brownie, the secret is peanut butter. While peanut butter is high in calories too, it’s a healthier type of fat. It’s also the only calorie-dense ingredient in our brownies. Using the maple syrup instead of all powdered sweetener also helps with the fudginess and moistness.
Fudgy brownies are also made with less flour – usually around half a cup. Our sweet potato protein brownies use only a quarter of a cup of oat flour, not only because we want fudgy, but also because the protein powder takes the place of some of the flour.
For fudgy brownies, the baking time may be slightly less than for a cakey brownie. Overbaking dries out the brownies more. if you err slightly on the under-baking side, these brownies will stay fudgy and soft – even a little creamy on top. You don’t want them too under-baked though, or they’ll end up the consistency of firm peanut butter. They’ll still taste great, but be stickier and messier to eat.
When you want your brownies to be fudgy, the biggest difference is you leave out the leavening (no baking powder or baking soda). That’s why you don’t see baking powder in this recipe.
If you like your bronwnies a little more cake-like and less dense, you can go ahead and include 1 tsp of baking powder. I’ve made this same recipe with and without the baking powder and the brownies are great either way. You’ll definitely notice the difference.
By the way, brownie purists argue that fudgy is the only way to go. They’ re certainly more popular. In a Facebook survey I conducted, with about 100 responses, only 2 people said they preferred cakey brownies. That said, cakey is a perfectly fine option.
The Cocoa
If there’s no chocolate in this, then how do we make it taste like chocolate? Simple, we get plenty of chocolate flavor by using chocolate protein powder and unsweetened cocoa powder.
There are two kinds of cocoa – natural cocoa powder (the regular kind) and Dutch process cocoa powder. The biggest difference is that the Dutch-process cocoa powder is darker (think Oreos).
If you search online for “best cocoa for brownies,” you come up with many recommendations for the Guittard Dutch Cocoa. I’ve tried it and it is indeed dark and rich, but the regular unsweetened (natural) cocoa available in your local grocery store (like Hershey’s brand) works great. You could try both kinds and see if you have a preference.
The Dutch cocoa also has more fat so using regular cocoa is another way to drop the calories. It may only save 40 calories in the whole batch, but it’s yet another reason the calories are so low in our brownies (I’m always looking for any way to to cut calories).
By the way, if you’re following a recipe like ours that doesn’t include baking powder or baking soda, it doesn’t matter which cocoa you use. If you’re using baking soda to make a more cakey brownie, stick with natural (traditional) cocoa powder. That’s because it has to combine with acidic ingredients to leaven, and in Dutch-processed cocoa, the powder has been processed to remove acidity.
Fat
No type of brownie is a low-fat food. Yeah, I know, if you Google, you’ll find fat-free “brownies.” I’m not dissing, but let’s call a spade a spade. Those are cakes, not brownies.
Classic brownie recipes use loads of butter – usually at least 8 tablespoons (that’s a whole stick!) On top of that, there’s cocoa butter in the chocolate as well. The saturated fat count in regular brownies is through the roof! We want brownies that keep you healthy, and also help you lose body fat by saving you calories. That’s why we don’t use butter or chocolate.
The dilemma is, if there’s no fat of some kind used, there’s no way you’ll get a rich and fudgy brownie. What’s a healthy baker to do? Use a healthier fat, of course. We used peanut butter. That helps keep these brownies fudgy.
And even with chocolate being the dominant flavor (from the chocolate protein powder and the cocoa), you still notice the taste of peanut butter underneath – and who doesn’t like chocolate plus peanut butter? (I could have called them sweet potato chocolate peanut butter protein brownies, but that’s too long).
I suggest weighing all your ingredients (weight not volume), especially peanut butter on a good digital food scale. It’s important in baking to get a consistent product. It’s equally important for calorie control. Peanut butter is notorious for being underestimated when scooped out by tablespoons or cups. But a gram of weight is a gram of weight, always.
We also keep two whole eggs in the recipe (not egg whites alone). Some recipes are fine with egg whites only, and that saves calories, but for fudgy, rich brownies, we use the whole egg. Of course, this also boosts the protein content.
Sweetener
Most brownie recipes call for at least a cup of sugar. I’ve seen many at 1.25 to 1.5 cups, and some that use 2 cups! That will make the brownies super sweet, but also wicked unhealthy and hyper-caloric.
In my first batch of brownies, I used a half a cup of regular pure maple syrup as one of the sweeteners and only a couple packets of non-caloric sweetener to boost it a bit. It was good, but not sweet enough for my tastebuds. In later batches, I used 2 tablespoons of Truvia Naturally Sweet (a crystalline stevia/erythritol sweetener) and it was better.
Maple syrup may be slightly more nutritious than table sugar, but it’s still sugar by another name and very high in calories. Looking at the macros, I wondered if sugar-free or light maple syrup would still work. I was hoping so, because the calorie savings are huge! We’re talking about slashing 420 calories off of the whole batch!
Good news – it worked fine with light maple syrup! The consistency of the brownies was still the same, but I still felt it could be a bit sweeter. So, ultimately in the final version, I bumped the Truvia up to 4 tablespoons, and it was perfect.
Looking at the conversion charts, I saw that 4 tablespoons is equal to just over half a cup of regular sugar. If there’s half a cup of maple syrup and the equivalent of half a cup of sugar (via sugar substitute), then this approximates the sweetness you’d get in a traditional brownie, but without all the calories.
The Healthy Secret Ingredient: Sweet Potato
In Burn the Fat Feed the Muscle recipes, our goal is not only to avoid unhealthy ingredients but also include healthy ones. You can’t do much better than sweet potatoes – they’re a staple food in bodybuilding and fitness diets.
You could easily bake, skin and mash whole sweet potatoes, but a much faster and easier option is canned sweet potato puree.
Skip the stuff that’s packed in added sugars and look for the natural kinds that have only one ingredient: sweet potatoes. This type may not be stocked in regular grocery stores but most health food stores carry it. I usually go to Amazon and order the Farmer’s Market brand sweet potato puree.
The puree serves another purpose as a fat (I.e. butter) substitute, much like applesauce is used in muffins and cakes. It’s not a one to one replacement, and is usually used in place of 50% of the butter. But since we use peanut butter as the other fat source in this recipe, just three-quarter of a cup of puree is perfect.
The sweet potato also adds a nice additional layer of flavor – you get just a hint of it underneath the chocolate.
Creating The Batter
Be sure to mix the liquid and the dry ingredients separately and then add the liquid in to the dry. Then mix the wet and dry until they are completely combined.
This ensures that you evenly mix everything. That’s important if you want a nice, even batter without chunks or spots of anything. Little clumps of peanut butter aren’t so bad, but spots of dry flour or protein powder in your otherwise moist, fudgy brownie are a bummer.
If you’re going to add baking powder, it’s also important to mix all those dry ingredients together so the leavener is evenly dispersed.
Avoid overmixing. One one hand you want all the ingredients fully combined, but if you overmix, it can produce air bubbles which makes the brownies fluffier and cakier rather than denser and fudgier. Mix the ingredients just enough and then no more. It’s okay if there are still little specks of peanut butter than didn’t completely disperse, just make sure there are no pockets of powder.
The ideal tool for mixing and transferring the batter into the pan is a rubber/silicone spatula like this one.
The batter is thick, but it should spread out when you pour it into the baking dish. If not, simply spread it around until it’s settled in evenly. Then you’re ready to pop it into the oven.
Baking Pan Type And Size
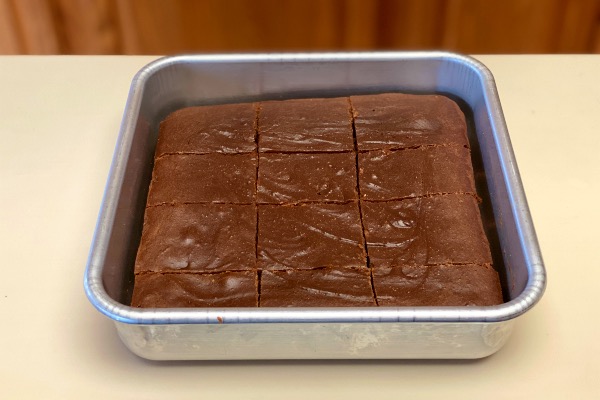
The size of the baking pan matters because the amount of batter indicated in a recipe is used in conjunction with a specific pan. I used an 8 X 8 inch aluminum baking pan.
It’s not that you can’t use a larger one (you can, and in fact, some recipes call for a 13 X 9 pan). But if you use the same amount of batter, it will spread out into the larger pan more thinly because of the greater surface area. That may affect the baking time and the end result (thinner, drier, overcooked).
Conversely, if you follow a recipe that calls for a larger pan, but you use the same amount of batter in a smaller pan, your brownies may be thicker. That might lead to the centers being undercooked.
At first I only had a glass (Pyrex) 8 X 8 baking dish in that size. It worked fine – the brownies were delicious – but they did stick to the bottom a little – I think baking in glass is faster (which might call for less time or lower temperature).
Around the same time, I learned that aluminum (light) silver pans conduct heat more evenly and are less likely to lead to bottoms or edges overbaking or burning. I discovered this when I made the first batches of my protein banana bread in a dark (nonstick) 9 X 5 meatloaf pan. It came out great, but the bottoms and edges were dark brown – not burned, but close to crispy.
When I switched to the silver aluminum 9 X 5 pan, the bottoms and edges were light golden brown. I never went back, and in fact, added the 8 X 8 silver aluminum pan to my cookware collection for brownies. (This one: Nordic Naturals aluminum 8 X 8 baking pan)
If you only have dark metal or glass baking dishes, no problem, just remember you may need to reduce the baking time. 20 to 22 minutes might do it, versus 23 to 25, and you may want to check it even earlier, watching for doneness.
Regardless of the pan you use, it helps if you grease the bottom with nonstick spray. Another option is to line the bottom with parchment paper. If you use enough so there’s extra hanging over the sides, then you can easily lift the brownies right out of the pan and onto a cooling rack, plate or platter.
Another option that I haven’t tried yet is to use a brownie tin, and then you completely eliminate the problem of cutting your chocolatey creations into perfectly sized squares (which never seems to happen unless you break out a ruler and score the edges exactly where you want to cut.
Baking Time
Baking time can be tricky because it may vary for a variety of reasons. Oven temperatures may differ. Then you have differences in cookware, as mentioned above.
Which rack you use matters too. On the bottom rack, your brownies may overcook or burn on the bottom. On top, they may be left undercooked. That leaves the middle rack as the happy medium where the heat is most evenly distributed and is ideal for brownies and similar items like cookies, cakes, and muffins.
The classic way to check for doneness is to stick a toothpick in, and when you pull it out, it should have only a few crumbs or a thin trace of batter on it. If the toothpick is coated with with thick wet batter, it’s not done yet.
I discovered there are other ways to check doneness with visual inspection. This helps a lot because sometimes that toothpick test doesn’t tell the tale (not to mention it saves you from poking a bunch of holes in your brownies as well, if that matters to you).
First, if the edges start to become a little lighter brown in color and appear to be drying, while the center is a little darker and still looks slightly under-done, that is my number one way to tell it’s ready. If the center looks dry and lighter, you are already overcooked. You may also notice that the sides will shrink slightly away from the edges of the pan, which also indicates done or almost done.
Perfectly baked fudgy brownies actually look slightly underdone in the middle when you take them out of the oven. That’s okay as long as it’s set (not wet or jiggling). It’s better to be slightly under-done in the center than overdone. That’s because the brownies will continue to cook a little more after they’re out of the oven and will solidify more as they cool, especially if you refrigerate.
One more tip: Try the prescribed baking time on your first batch. In our case it’s 23 to 25 minutes. Start checking at least 5 minutes early. If it’s done early, write down the baking time. If it’s under-done, leave it in a little longer and when done, write down that time. This will be how long you’ll bake for in the future with your oven and your cookware.
Oh, and don’t forget to use a kitchen timer. It’s always the worst feeling when you walk away and completely forget your goodies were in the oven, until it’s too late.
Cutting The Sweet Potato Protein Brownies
Be sure to let your sweet potato protein brownies cool before you cut and serve them. They will cut more cleanly that way. Some people even like to put them in the refrigerator or freezer briefly to expedite the cooling.
If you cut them right out of the oven, you’ll usually pull up batter and crumbs with every knife stroke and your cut brick of brownies will look like a plowed field. Still tasty, but not as presentable.
Once cooled, use a sharp knife, and it may help to dip it in hot water first, wipe it dry and then cut in an up and down sawing motion. Any time brownie clumps onto the knife, wipe it again before continuing. If batter sticks to your knife like warm peanut butter, your brownies were undercooked. (Don’t worry, while messy, they’ll still taste great, but remember to bake longer next time).
Storing Your Brownies
After you cut your brownies, store them in an airtight container, or you can cover the pan tightly with plastic wrap or aluminum foil.
If you leave them out at room temperature, they’ll keep for about three days. They’ll stay fresh a little longer, maybe five days, if you put them in the refrigerator. They are equally tasty at room temp or chilled (or even out of the freezer).
If you’re not going to eat them within several days, you can freeze them. The best bet, if you’ve already cut them, is to wrap each brownie in plastic or foil, and then put them in an airtight ziplock storage bag. If you didn’t cut them, you could put the whole pan in the freezer, and when it hardens, remove the whole block of uncut brownies, and wrap that in plastic or foil and zip that up in a large airtight storage bag. Then cut them later.
Personally, I’ve never had to freeze any yet – every last brownie is always devoured by family or friends who wandered through the kitchen, where the brownies were left out on the counter in all their tempting glory.
The best sweet potato protein brownies
Ingredients
- 184 g Sweet potato puree (3/4 cup)
- 192 g Natural smooth peanut butter (3/4 cup)
- 1/2 cup Sugar-free maple syrup
- 2 large Whole eggs
- 1 tsp Vanilla extract
- 22.5 g Oat flour (1/4 cup)
- 46.5 g Chocolate whey protein (1/2 cup)
- 20 g Unsweetened cocoa powder (4 Tbsp)
- 4 Tbsp Truvia Naturally Sweet
- 1/4 tsp salt
Instructions
-
1. Pre-heat oven to 325
-
2. Prepare an 8 X 8 baking pan, coat bottom with nonstick cooking spray
-
3. Measure the peanut butter in mixing bowl (on scale preferably). If not room temp and easily mixable, heat in microwave for 30 seconds.
-
4. Add sweet potato, eggs, maple syrup and vanilla extract to bowl. Stir with rubber/silicone spatula to combine until smooth.
-
5. In separate mixing bowl, stir together protein powder, cocoa powder, oat flour, baking powder, salt, and sweetener.
-
6. Pour dry ingredients into wet and mix thoroughly into thick batter.
-
7. Pour batter evenly into baking pan.
-
8. Bake at 325 in the center rack for 23-25 minutes.
-
9. Check early for doneness. It's done when the edges start to look drier and lighter in color, and a toothpick inserted in the center comes out mostly clean (not covered with wet batter).
-
10. Allow to cool at room temperature for 1-2 hours first before cutting.
Nutrition
Yes – it’s true. I’m working on a Burn the Fat, Feed the Muscle recipe book. Nope. No idea when it will be done.
In the meantime, check back every week here at Burn the Fat Blog where I’ll share some of my favorite recipes. The ones that get the most feedback and highest ratings will be most likely to make it into the book! Plus, I’ll keep doing more recipes like them. So please post comments and leave ratings (after tasting these brownies).
You can also join us now in the Burn The Fat member’s only area and get instant access to the entire collection of recipes so far (170+), as well as the Burn the Fat Meal planner software (which I use to create daily meal plans and perfect my recipe macros) at: www.BurnTheFatInnerCircle.com
Until next time,
-Tom Venuto,
Author, Burn the Fat, Feed the Muscle
PS. Leave a comment below and let me know what you think. Share pictures of yours on social media with #burnthefatrecipes #feedthemuscle or #burnthefatfeedthemuscle and tag me @TomVenuto
Disclosure: Burn the Fat Blog posts may use affiliate links to third-party websites and online stores, and earn a commission if products or books are purchased. We never recommend or link to products we haven’t used and fully endorse. However, always do your own due diligence if purchasing from a third party merchant on the internet.
The post The Best Sweet Potato Protein Brownies In The World appeared first on Burn The Fat Blog.
from Burn The Fat Blog https://www.burnthefatblog.com/best-sweet-potato-protein-brownies/
