

 |
| Advertisement |
A traditional mug cake really is cake – a dessert with lots of sugar and fat. It’s not unusual for one of these treats to have 500 to 600 calories. My mission here with the apple pie protein mug cake was to cut calories in half or even more, while keeping great macros – Burn the Fat, Feed the Muscle style!
Once again, mission accomplished! The apple pie protein mug cake has only 263 calories, yet it contains a full meal’s-worth of protein (35 grams per mug cake).
The high protein content comes mainly from the vanilla whey protein, which contains 24 grams of protein per serving (usually 31 grams of weight per scoop or approximately 1/3 cup). The rest is from egg whites, greek yogurt and there’s even a bit of protein in the flour.
A few companies make apple pie or apple cinnamon flavored whey, and if you can find it, that would probably taste great, but vanilla works nicely, and is more widely available.
I don’t think the type of flour makes much difference. I’ve tried a few flours and even combining different flours and the taste is still similar. If you don’t have oat flour on hand (one of my favorites), all-purpose flour works fine. (Oat flour is available at Amazon as well).
The apple flavor comes from the applesauce (which by the way is a one for one fat alternative when you are baking light and wanting to save on calories). Add cinnamon to your liking. I usually use 1/2 a teaspoon (at least 1/4 teaspoon recommended), with a little more sprinkled on top.
I was curious what these might be like with finely diced fresh apple chunks (also sprinkled with cinnamon), so I finally tried it and while the cake is great without fresh apples, including them is an improvement! It adds moisture and crunch. Plus, this version can be called, “apple pie protein mug cake!”
You can avoid calorie-dense refined sugar by using any non-nutritive sweetener you prefer, such as stevia, truvia, Splenda and so on). A few packets go in the batter and then you can sprinkle a little more on top. Feel free to adjust the amount to your own tastes.
Be sure not to overcook as you don’t want it to dry out completely, especially if you want this “gooey” version of the mug cake.
What if you don’t want it gooey? What if you want the whole thing solid like regular cake or a muffin? No problem. Simply omit one ingredient – the Greek yogurt. It’s the yogurt that helps keep the bottom moist and gooey molten.
When you leave out the yogurt, unless you undercook it, the finished product will be mostly solidified and dry, yet with a lightly-moist spongy cake consistency from top to bottom. If that fails, then next time, cook 5 to 10 seconds longer, and or shift the balance of wet to dry ingredients slightly toward less wet and or more dry.
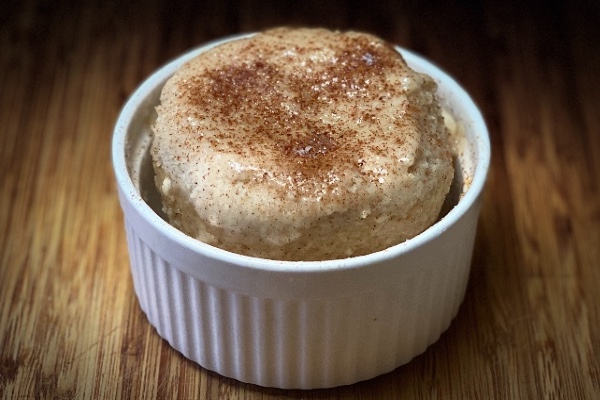
You can eat this with a fork right out of the mug, or if you want the gooey stuff on top, flip the mug upside down over a plate or ramekin before serving. (Makes for nice presentation too). Then what was the gooey bottom will now be your gooey top, almost as if you had put frosting on it.
Sprinkle some cinnamon and if you choose, additional sweetener on top, and then enjoy the gooey goodness with every bite.
INGREDIENTS:
3 Tbsp oat flour (or all-purpose flour)
31g (approx 1/3 cup) vanilla whey protein
60g (1/4 cup) unsweetened applesauce
1 Tbsp (14g) nonfat plain Greek yogurt
1/4 cup (24g) diced apple
60g (1/4 cup) liquid egg whites (equals 2 large egg whites)
1/8 tsp salt
1/4 tsp baking powder
1/4 -1/2 tsp cinnamon to taste, plus sprinkle on top
3 packets (or to taste) sweetener of your choice (stevia, truvia, Splenda, etc)
Yield: 1 serving (1 mug cake)
NUTRITION INFO PER SERVING (1 MUG CAKE)
Calories: 263
Protein: 35.2g
Carbs: 27.1 g
Fat: 2.9 g
1. Combine the dry ingredients in a small bowl or pyrex cup.
2. Add the wet ingredients and mix well with a fork or spoon.
3. Coat the inside of a large mug / coffee cup with non stick spray.
4. Pour the batter into the greased mug.
5. Microwave on high for about 60 seconds. It’s normal for the cake to rise up while cooking, then settle back down (so use a large mug).
6. When it’s done, the top and edges will be set like cake, but the bottom will still be gooey.
7. Let it sit for a minute or two to cool.
8. Eat right out of the mug or (much better), flip the cake over into a ramekin (or plate/bowl) if you want it gooey-side up.
9. Sprinkle more cinnamon on top, along with more sweetener (optional), and enjoy your apple pie protein mug cake!
Yes! My goal is to eventually publish a Burn the Fat, Feed the Muscle recipe book. In the meantime, keep checking back every week here at Burn the Fat Blog where I’ll share some of my most popular recipes…
And you can join us now in the member’s only area and get instant access to the entire collection of recipes so far (170+), as well as the Burn the Fat Meal planner software at: www.BurnTheFatInnerCircle.com
Until next time,
-Tom Venuto,
Founder, Burn the Fat Inner Circle
Author, Burn the Fat, Feed the Muscle
PS. If you like how this looks and you want to try it, and especially if you’ve already tried it, please leave a comment below and let me know what you think. Share pictures of yours on social media with #burnthefatrecipes #feedthemuscle or #burnthefatfeedthemuscle.
Find me (Tom Venuto) on instagram and see new recipes there first at: www.Instagram.com/tomvenuto
PS. Missed last week’s recipe? Check out Burn the Fat, Feed the Muscle High Protein Banana Bread
Disclosure: Burn the Fat Blog posts may use affiliate links to third-party websites and online stores, including Amazon, and may earn a commission if products or books are purchased, at no cost to you. We never link to products we haven’t used or books we haven’t read and fully recommend and endorse. However, always do your own due diligence if purchasing from a third party merchant on the internet.
The post Apple Pie Protein Mug Cake (Low Fat, No Sugar) appeared first on Burn The Fat Blog.
from Burn The Fat Blog https://www.burnthefatblog.com/apple-pie-protein-mug-cake/
